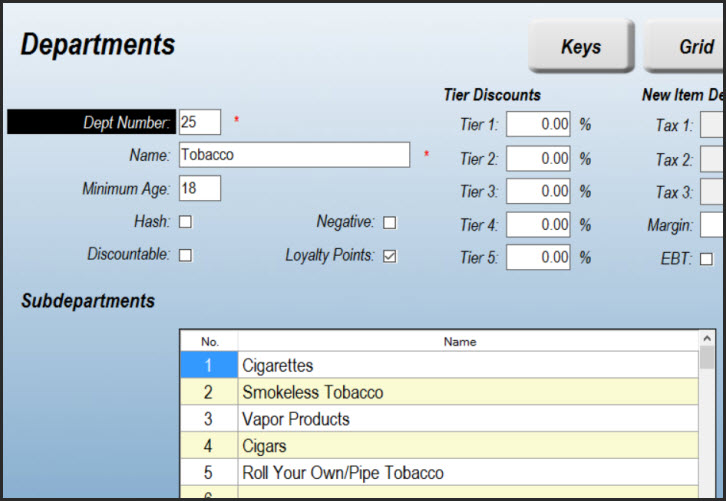
IMPORTANT NOTE: Prior to November 2023, AGDC did not wish to receive Scan Data for Vapor Products. Since that time, they have opted to receive this information. In preparation for this we have set a condition for you to send Vapor Products information.In your SUBDEPARTMENT names, add a period (.) to the end of the words "Vapor Products". When you have completed and saved this your Subdepartment entry for this category will read: "Vapor Products." (the period next the the last letter is needed to send this data).
Step 2: Brands
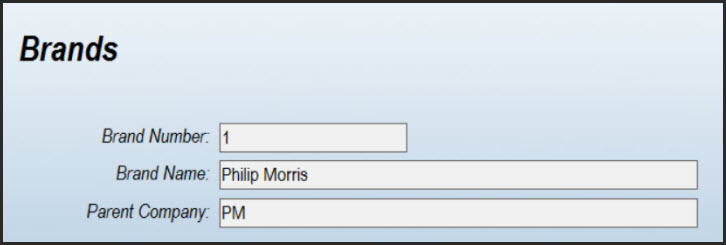
Navigate to the Brands category (
Data > Inventory > Brands). Create an entry for Philip Morris and RJ Reynolds -
as well as for any other tobacco brands you sell. For AGDC/Philip Morris, enter "PM" in the Parent Company field. For RJ Reynolds enter "RJRT" in the Parent Company field. For other brands you may disregard the Parent Company field.
Note: If you are also participating in the USSTC Scan Data program, create a Brand with the name "USSTC" and the Parent Company "PM". This will ensure that your USSTC products are included in the Philip Morris Scan Data report.It is critical that you enter the Parent Company initials exactly as specified. Only "PM" or "RJRT" (no quotes) will work!
Note: If you are also participating in the Philip Morris Loyalty Fund Program (LFP), you'll need to create a separate Brand for LFP qualified products (Marlboro Mainline). Read this article for more details.
Step 3: Products
On the Products screen (
Data > Inventory > Products) for each tobacco item, edit the record so that the proper Brand, Department and Subdepartment appear as outlined above.
Additionally, you are required to report the size ("consumer units") and UOM (unit of measure) for each item. Using the Size and UOM fields on the Product record, enter the appropriate data.
For example:
- Pack of cigarettes - Size = 1, UOM = PK
- Carton of cigarettes - Size = 10, UOM = CT
- Smokeless tobacco tin - Size = 1, UOM = CN
- Smokeless tobacco roll - Size = 5, UOM = RL
- Cigar (individual) - Size = 1, UOM = EA
- Vapor (Vape) cigarette - Size = 1, UOM = EA
The only acceptable abbreviations for the UOM field are: PK (pack), CT (carton), EA (each), CN (can) or RL (roll).
Step 4: Multi-pack and Promotional Discount Price Formulas
You can create Price Formulas that can be applied as a multi-pack discounts or promotions to your tobacco products. Using this method eliminates the need to manually enter the discount, as it will be automatically applied when scanning the products.
For Philip Morris, you will use Price Formulas to create multi-pack discounts. For RJ Reynolds you can create multi-pack discounts (Outlet or Manufacturer) or single-pack promotions (Account, Manufacturer Buy-Down or Manufacturer Promotions). Only one Price Formula is allowed on a product at any time, but you may LINK Price Formulas (see below).
Navigate to Tasks > Pricing > Formulas and create a new formula. Use a discriptive name (or the provided promotion name from your account representative) and select Option 7.
In the
Qty + field, enter the threshold quantity that qualifies for a discount. For example, if the discount is "
$1.00 off 2 packs", enter "
2".
Enter the amount of the discount to be given once the threshold is met, in the
Discount field. In the above example you would enter $1.00.
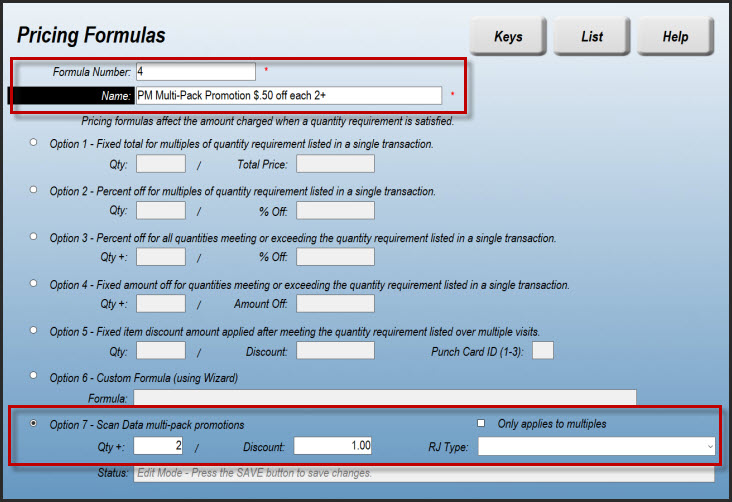
Check the "
Only applies to multiples" box if the promotion only qualifies for each multiple of the
Qty+ field. For example, if the promotion gives a $0.50 discount for each pack when 2 packs or more are purchased, leave this box unchecked.
In the case where multiples are NOT checked, you want to enter the value of the threshold (i.e. 2 or more) pack discount in the Discount field.
- Discounts that apply to non-multiples (i.e. "Save $0.25 each when you buy 2 or more") need to be reflected as
- Qty = 2
- Discount = $0.50 (amount of per-pack discount x minimum quantity threshold)
- Multiples Checkbox = Unchecked
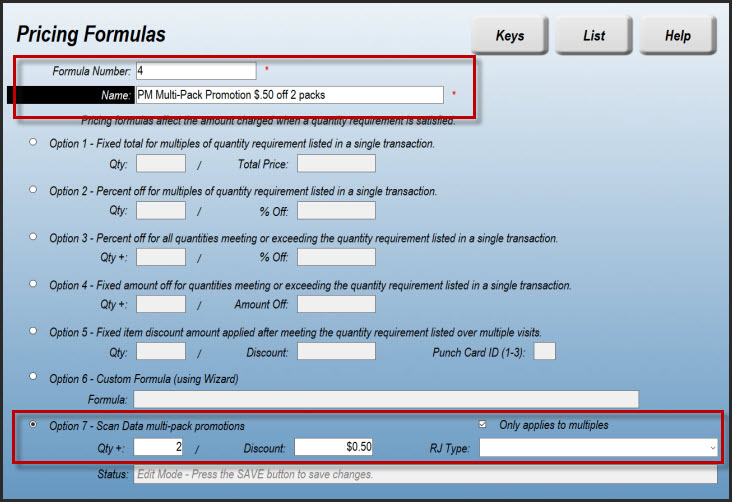
- Discounts that apply only to multiples (i.e. "Save $0.50 on every 2 packs") need to be reflected as
- Qty = 2
- Discount = $0.50 (amount of total discount when meeting quantity threshold)
- Multiples Checkbox = Checked
For example:
-
Promotion:
Save $0.50 each pack when you buy 2 or more packs. Formula: Quantity = 2, Discount = $1.00, Multiples Checkbox = Unchecked
-
Promotion:
Save $.50 on every two packs sold. Formula: Quantity = 2, Discount = $.50, Multiples Checkbox = Checked
A $0.50 discount is applied for every multiple of 2 packs sold. If you sell 3 packs, only one discount is applied because only the first two qualify for the discount. If a fourth pack is sold, two discounts are given, and so on.
You can use either of the two above promotions for Philip Morris multi-pack or RJ Reynolds multi-pack (Outlet) promotions.
For the following RJ Reynolds promotions, you must select the "RJ Type" from the dropdown list. For the "Outlet Multi-Pack" promotion, keep the RJ Type field blank.
- Manufacturer Multi-Pack
- Account Promotion
- Manufacturer Buy-Down
- Manufacturer Promotion
If you participate in the RJ Reynolds scan data program and are creating a Philip Morris (Altria) Multi-Pack promotion, you may have special considerations to take into account. While Philip Morris (Altria) does not differentiate between account (Outlet) funded and manufacturer funded multi-pack discounts, RJ Reynolds does. Therefore, if the Philip Morris multi-pack discount is a manufacturer funded discount, you should assign "Mfr multi-pack" in the RJ Type drop-down box of the Price Formula. This will ensure that the discount is properly categorized for RJ Reynolds scan data reports.
NEW with the latest version of StoreTender Pro, Back Office or HQ:
You can now LINK Price Formulas to be applied. This allows you to have multiple Price Formulas on your tobacco products. For example, you may have an Outlet Multi-Pack promotion
and a Buy-Down. The link selector is just to the right of the RJ Type dropdown. Just create your promotions and then on your primary promotion add the link to the secondary one. If you have 3 promotions, add the 3rd promotion link to your second Price Formula. You can have as many as you wish, daisy-chaining one to another. Just be sure that you don't create a circular link or the promotions will run wild on your POS screen.

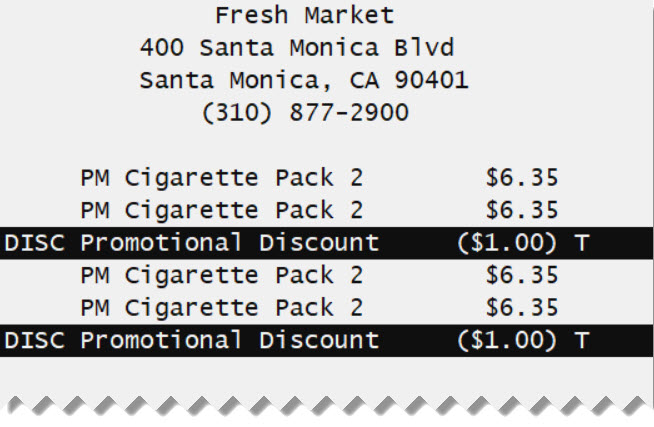
Depending on the type of Formula you have attached to your product, the discount will appear as below, once the qualifying quantity has been sold:
For a discount on all quantites above the minimum - i.e. $0.25 off each pack when you buy 2 or more:
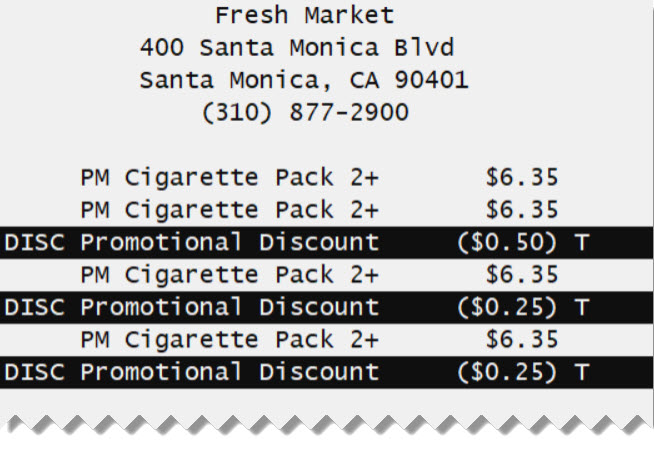
If the discount is for
multiples of a quantity (box checked in Formula) - i.e. $1.00 off for every 2 packs you buy:
Step 5: Screen Designer
If you are going to support the Philip Morris Manufacturer Deal promotions, you must create touchscreen buttons that will apply a discount to your cigarette sales.
As part of the Scan Data program, these promotions must be applied to the tobacco products using the proper function. For Philip Morris, you'll want to use
Price Formulas for multi-pack discounts. If you want to use Manufacturer Deal promotions with Philip Morris, you'll need to follow the instructions below.
Available Philip Morris Manufacturer Deal promotions (and the corresponding Screen Designer Function name) are:
- Manufacturer Deal 1 (A discount provided through a manufacturer-funded coupon, if you do not scan the coupon at the POS)
- Mfr Deal 1 Disc
- NOTE: StoreTender supports the scanning of coupons, so using this function should only be necessary if you do not have the ability to scan the coupon.
- Manufacturer Deal 2 (A manufacturer-funded discount that is not a coupon, loyalty fund promotion, or defined test offer)
- Manufacturer Deal 3 (A discount provided through a manufacturer’s loyalty fund program)
- Mfr Deal 3 Disc
- NOTE: As Loyalty Fund Discounts are now tracked via Brands and the creation of a Loyalty Fund Product, you should not use this screen function. Instead, see Philip Morris / USSTC Loyalty Fund Program for instructions in setting up loyalty fund discounts.
These discounts are available through the Functions of the Screen Designer (
Setup > Store > Other > Screens). Depending on which discounts you offer you may choose to use one or all of the available options.
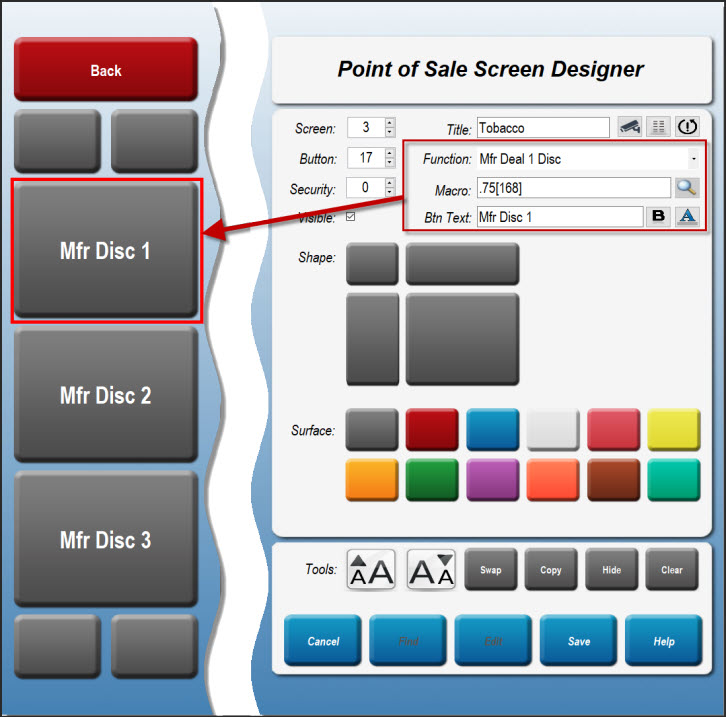
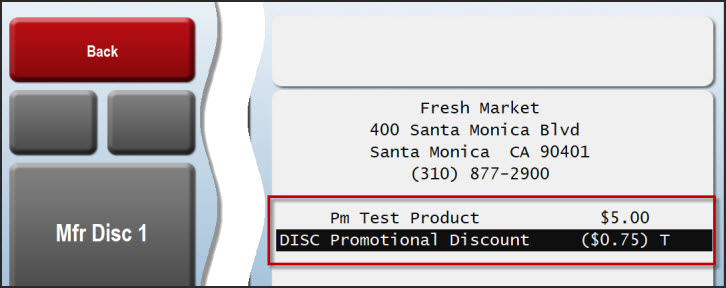
In the below image the promotional group has been created. The top promotion -
Mfr Disc 1 - has been created using the Function "Mfr Deal 1 Disc".
As you can see from the above example, we've added
".75" before the macro function. This means that when this button is pressed, a $0.75 discount is ready to be applied. If you do not wish the discount amount to be calculated with the button press, simply leave the macro as it is. You will then need to enter the discount amount prior to pressing the promotion button on the screen. As you can see, by using the function screen you can create many promotions and save time by entering the value of the promotion directly into the macro field.
Step 6: Point of Sale
By now you should have all your Product data properly entered and your POS screen designed to your liking. Here are the steps to create a POS transaction:
- Scan the tobacco product or select it from the search results box.
- If any Price Formula applies, the savings will show onscreen once the formula threshold has been met.*
- If a Mfr Disc promotion applies, press the appropriate promotion function key (only if the promotion hasn't been used as a Price Formula).
- If you did not format the macro with a discount amount, enter that amount before pressing the promotion key.
- Now, touch the item to which the promotion is to be applied on the cashier receipt area.
* Note: In the event that the Product has a Price Formula discount, and you want to add a customer to the transaction, the customer account must not be set to Tier Pricing discounts. If they are, then assigning the customer before ringing in the products will not allow the Price Formula discount to apply. You must add the customer at the end of the transaction, after the Price Formula discounts have been applied.
**
You cannot use Department Grouping in your Receipts Setup if using Scan Data. Doing so will prevent the scan data file being written to. Ensure that you have "Dept Grouping" UNCHECKED in Setup > Store > Receipts.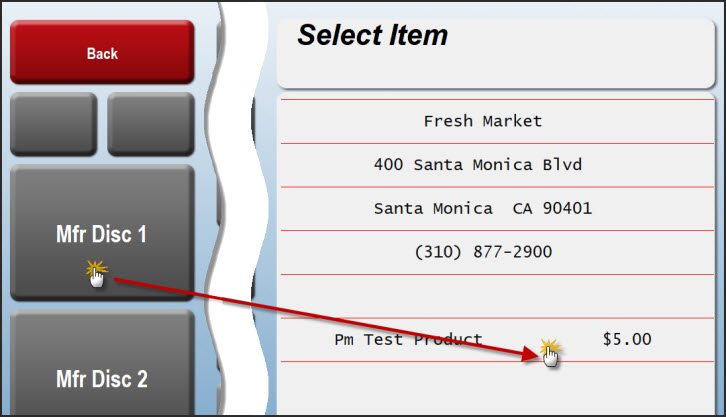
Step 7: Scan Data Reports
Scan Data reports are to be submitted each week. For AGDC/Philip Morris, the week ends on Saturday and the report must be submitted by the following Tuesday. For RJ Reynolds the week ends on Sunday and the report must be submitted by the following Wednesday.
These reports are NOT intended for your use to track the amount of funds owed to you by the various manufacturers. They are used by the manufacturers to track sales and promotional data and are provided per their specifications.The reports are text-based, suitable for submission through the manufacturer's website or FTP. You will need to get in touch with your Philip Morris and/or RJ Reynolds representative before sending your first report. They will provide you with the information necessary for report submission.
For single store merchants you can generate your report in Store
Tender Pro/Back Office by navigating to
Setup > Tools > File Utilities. For multi-store merchants using Store
Tender HQ, navigate to
Tasks > Send Scan Data. The following steps will guide you through creating and optionally uploading your report.
- Click the selection next to the report(s) that you wish to generate.
- Select the week ending date for your selected report. The calendar will only let you select the appropriate day of the week. If you select the incorrect day, the calender will automatically select the previous week's ending date.
- Click the folder icon to set the file destination on your desktop.
- Optionally click "SFTP File?" to automatically upload your file. Submit your supplied URL, Username and Password to our Support Department prior to using this function.
- Click Execute to generate the report, save the file and (optionally) upload.

Step 8: Report Submission
If you uploaded your file via SFTP, you have completed the submission process.
If you are using another program to upload your file(s), navigate to the folder on your desktop where the report(s) were saved. They are ready for submission through the method determined by your manufacturer representative (typically FTP software like "FileZilla"). You will likely be required to submit test files before going "live".
Notes:
If signing up for the RJ Reynolds Scan Data program you will be asked by the scan data collection agency to define the file format you will be submitting. The appropriate selection is "pipe delimited" and "without headers". Additionally, StoreTender can only SFTP to the RJ "Live" folder. For your test file submission you must use another method to SFTP your test file(s). Talk to your RJ representative about how to submit test files. Once you are certified for live production file submission, you may use StoreTender's SFTP method to do so.
Congratulations, you've set up and completed your Scan Data program configuration!
Philip Morris / USSTC / Helix Innovations (on!) Loyalty Fund Program
Store
Tender also supports the Philip Morris / USSTC / Helix Innovations (on!) Loyalty Fund Program (PM/USSTC LFP, Helix LFO), used in conjunction with the PM Scan Data addon module. To learn how to configure your software read these articles:
