ScratcherTracker Lottery Ticket Control
- Control and Verify Instant Lottery Ticket Inventory -
Keeping your Instant Lottery Ticket (Scratcher) inventory under control and profits secure can be a full-time task. Save time and money due to missing tickets by using the ScratcherTracker addon module to help your staff remain accountable.
From your POS you will be able to receive, activate, reconcile and sell scratcher instant lottery tickets. Keep track of serial numbers sold for expanded auditing. Take scratcher tickets from back-room stock to activated for sale at the POS. Even receive new scratcher tickets without needing to exit the POS. Using a barcode scanner you can quickly perform daily start and end reconciliations of each game.
Here's a brief introduction on how ScratcherTracker works:
- Sign up for the ScratcherTracker addon module. One subscription per store location is required. CLICK HERE TO ORDER
- Open a Support Ticket and send in two clear photographs of the back of two separate scratcher ticket games. Do not compress the images - full size is best. Each state has different layouts for the barcodes found on the back of the tickets, so we want to be sure we have the information needed to set up your addon properly. From your mobile phone send an email with your name, store name and the two images to: support@storetenderonline.com
- We will notify you via email when your setup is complete. To use ScratcherTracker, follow the steps below.
Step 1: Department Setup
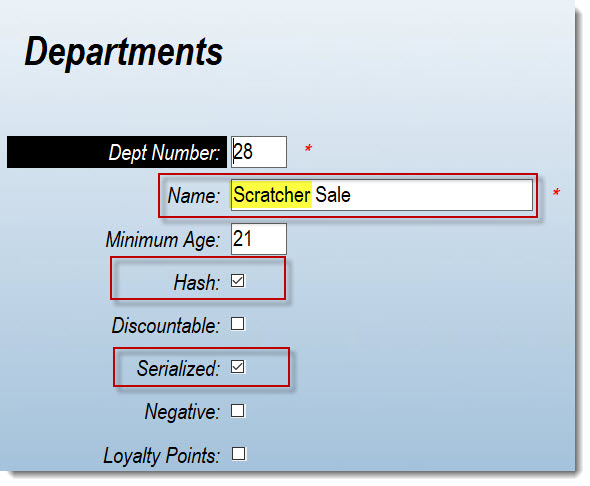
Your first step is to create (or edit) a Department for your scratcher instant lottery tickets. The department name must include the word "Scratcher". For example below are some acceptable and unacceptable names:
- Acceptable Names:
- Scratcher
- Scratchers
- Lottery & Scratchers
- Unacceptable Names:
- Lottery Tickets
- Scratch-Off Lottery
In addition to the specific name of the Department, you can also check if sales from that Department are pass-through (Hash), if age verificaion is required (Minimum Age) and whether or not to collect the serial number of the ticket sold.
Step 2: Add Scratch Menu Button to the POS Screen
Using the Screen Designer (Setup > Store > Other > Screens), add the "Scratcher Menu" function (macro [353]) to an open button. This will add a dynamic screen to your POS that will contain the ScratcherTracker functions. For help working with the Screen Designer, click here: Using the Screen Designer. Click "Save" and then SYNC your POS computers to accept the new screen layout. We will come back to the Scratcher Menu later.
If you wish to keep some of the functions secure, you can add each function as a separate button instead of the dynamic menu. Doing this allows you to assign a security level to each button.
For example, you might want only the owner or manager to be able to Receive and Activate Tickets.
The Screen Designer functions you would add are named:
- Receive Tickets
- Activate Tickets
- Ticket Count - Start
- Ticket Count - End
Step 3: Add Scratchers to Inventory
You likely already have Scratcher lottery tickets in your inventory. You should make sure they are all categorized in the Scratcher Department you created/edited in Step 1.
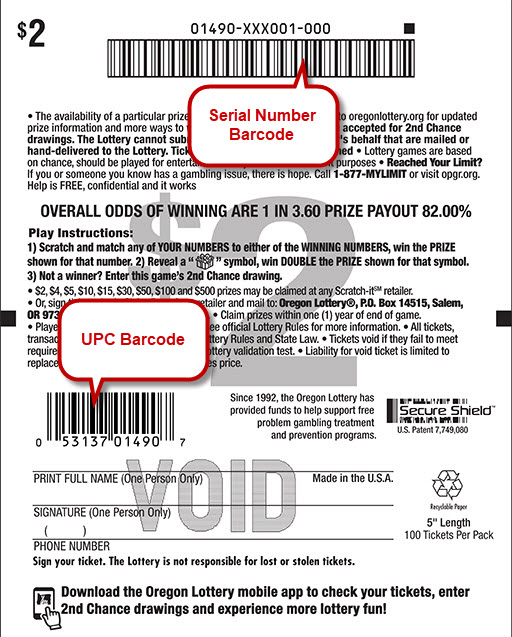
Most scratcher lottery tickets have two barcodes - a UPC barcode and a serial number barcode. The placement can vary, but the 12-digit UPC barcode is the one you would use as the PLU number for a Product in StoreTender.
The serial number barcode can vary in length, but is typically longer lengthwise than the UPC barcode. Unlike a UPC barcode, it does not have the beginning and ending "legs" and is all the same height.
If you opted in to collect serial numbers in the Scratcher Department setup, during a sale transaction you would first scan the UPC barcode, followed by the serial number barcode when prompted. This will place the serial number of the ticket sold on the receipt and Electronic Journal. The serial number barcode is also used when performing the ScratcherTracker tasks.
Step 4: Using the Scratcher Menu
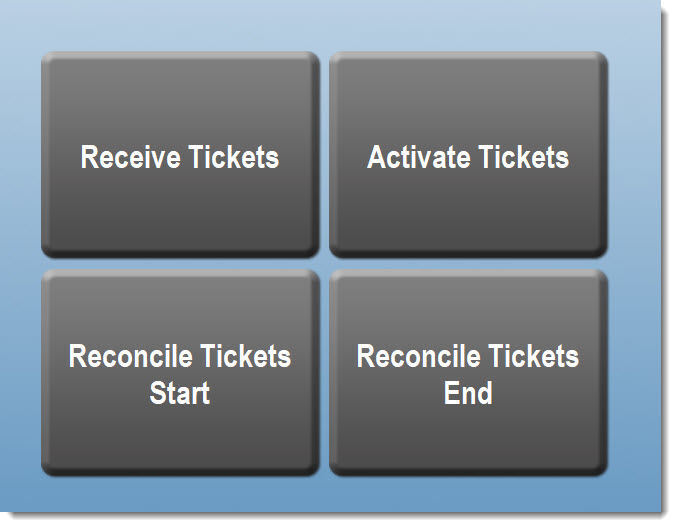
In the POS, press the "Scratch Menu" button you added in Step 2. A dynamic screen will appear with four function buttons.
Each of these functions perform a different task to control your Scratcher inventory.
- Receive Tickets
- Used to receive a book (or books) of tickets from your supplier into back-room stock. These tickets are not yet activated for tracking, so you must receive them first.
- Activate Tickets
- Used to activate tickets that have been previously received. This effectively takes the tickets from back-room stock and activates them for sale. If you do not activate the tickets, the sales are not registered within the ScratcherTracker module and your reconciliation reports will be off.
- Reconcile Tickets Start
- Used at the beginning of a shift or day to scan the next ticket numbers for each game.
- Reconcile Tickets End
- Used at the end of a shift to scan the next ticket numbers for each game. As stated previously, this step could be done at the end of each shift or each business day at closing.
Step 4.1: Receive Tickets
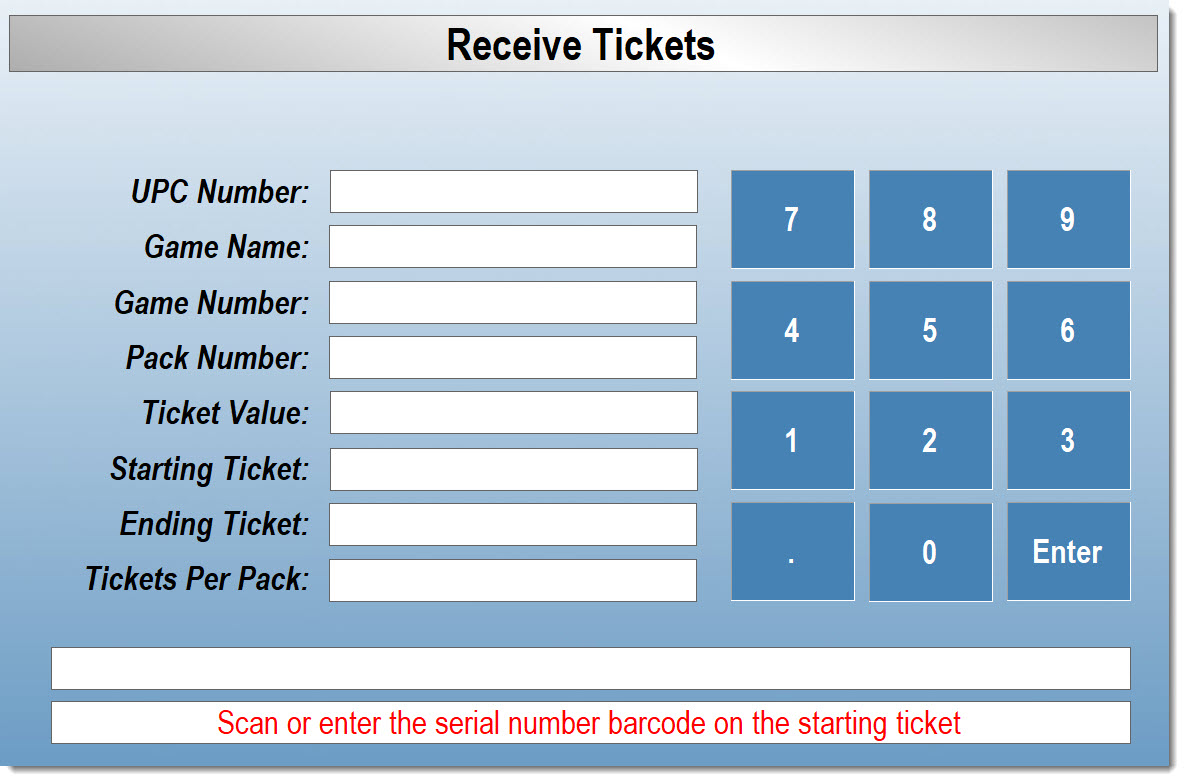
In the Scratcher Menu, press the "Receive Tickets" button. It is here that you will receive and/or create new games not yet in your inventory.FIRST TIME SETUP:
You will need to Receive [Step 4.1] and Activate [Step 4.2] your entire stock of scratcher tickets on the sales floor (in your bins or "front stock").
For each game you Receive, you'll be asked to add the game. Even if the game is already in your inventory, follow the steps outlined below. This is because the games must be added into ScratcherTracker, which saves additional information in the database.
If you also have game packs in "back stock" (not on the sales floor), you will need to also Receive those, but do not Activate them until you move them to the front stock ticket bins.
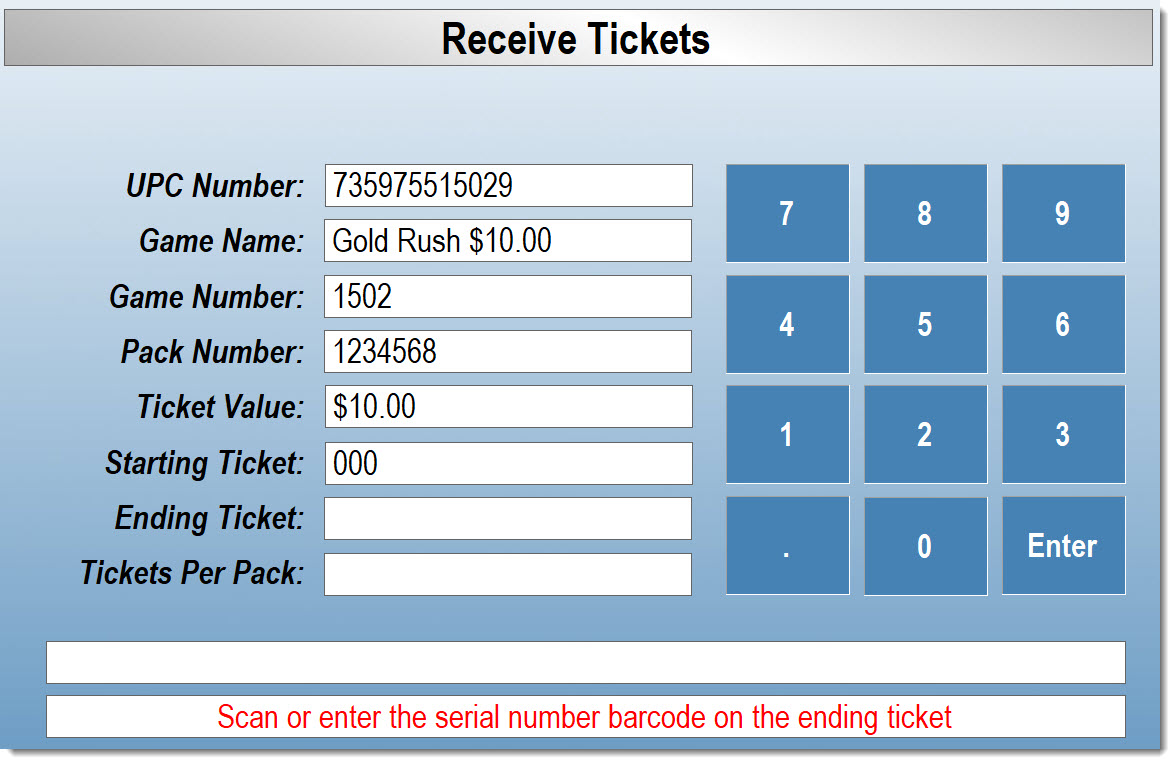
Follow the instructions on the screen and scan the starting serial number barcode (not the UPC) on the new game pack you are receiving.
If the game has previously been received for your store via ScratcherTracker, you'll be instructed to scan the ending ticket serial number, skipping the next four prompts.
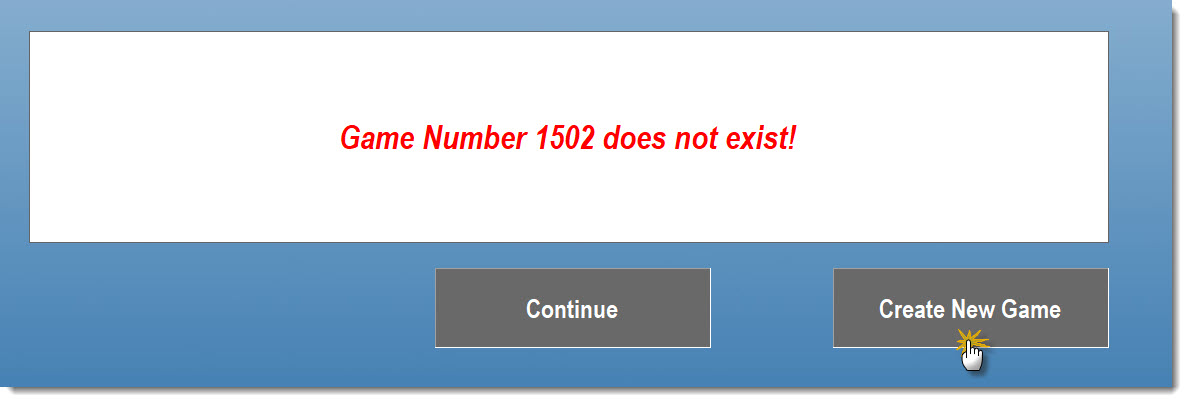
If the game has not been previously received for your store via ScratcherTracker, you'll see the below dialogs that will prompt you to add the game. Click "Create New Game" to add it on-the-fly. Keep in mind that the game may exist in your inventory already, but there is data collected via ScratcherTracker that must be added. You'll find after use that the routine allows you to quickly add games.
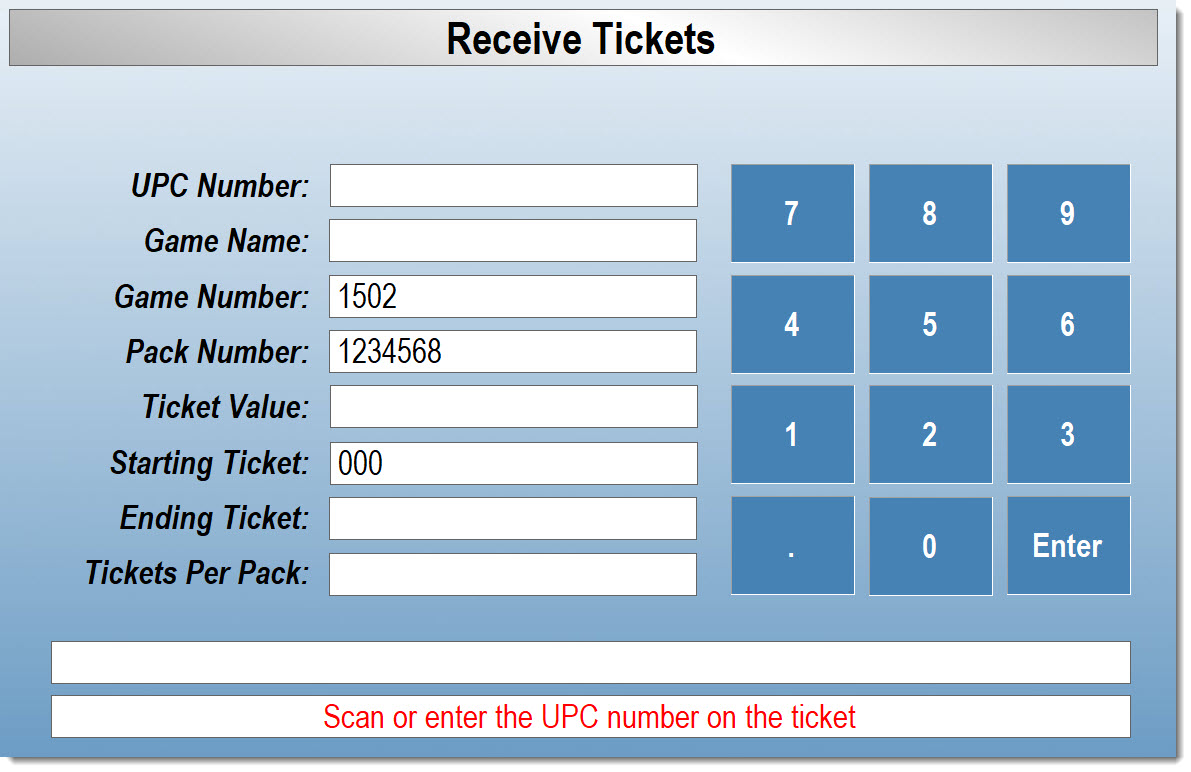
Next, you will be asked to scan the UPC on the new game ticket.
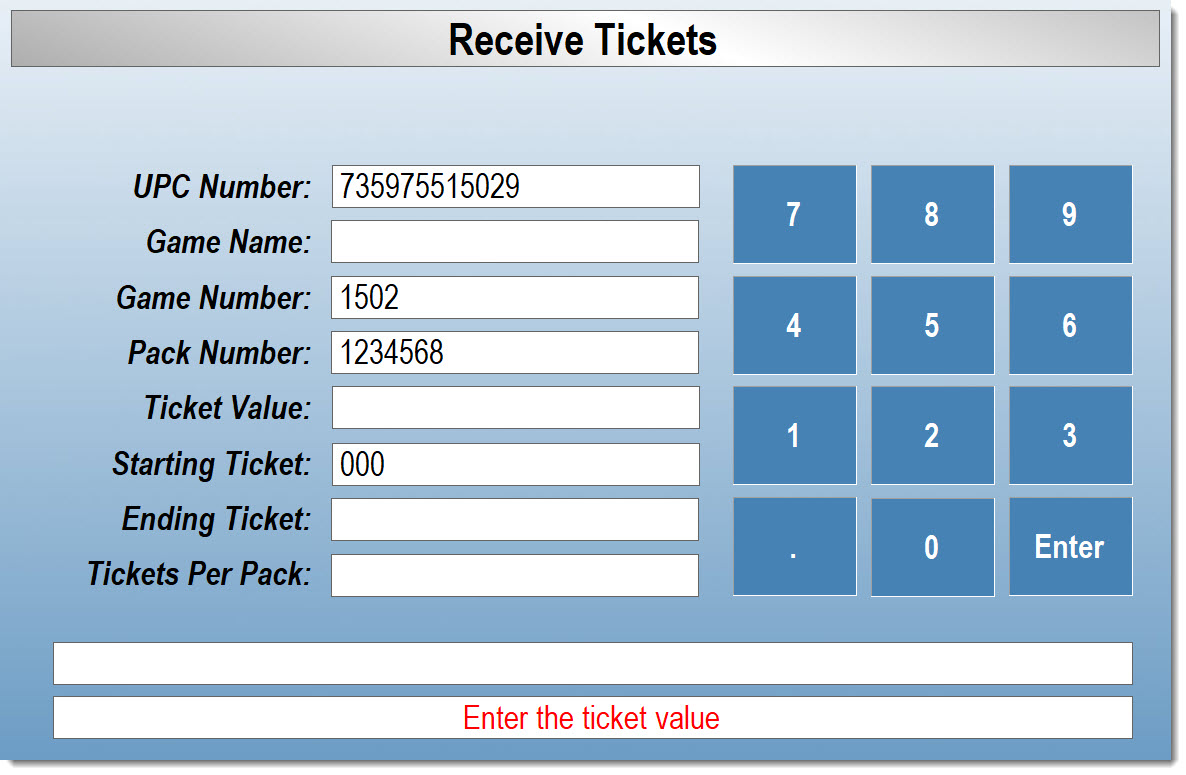
Once the UPC has been scanned, enter a value (price) for each ticket. Use the keypad on screen. Press the Enter button when finished.
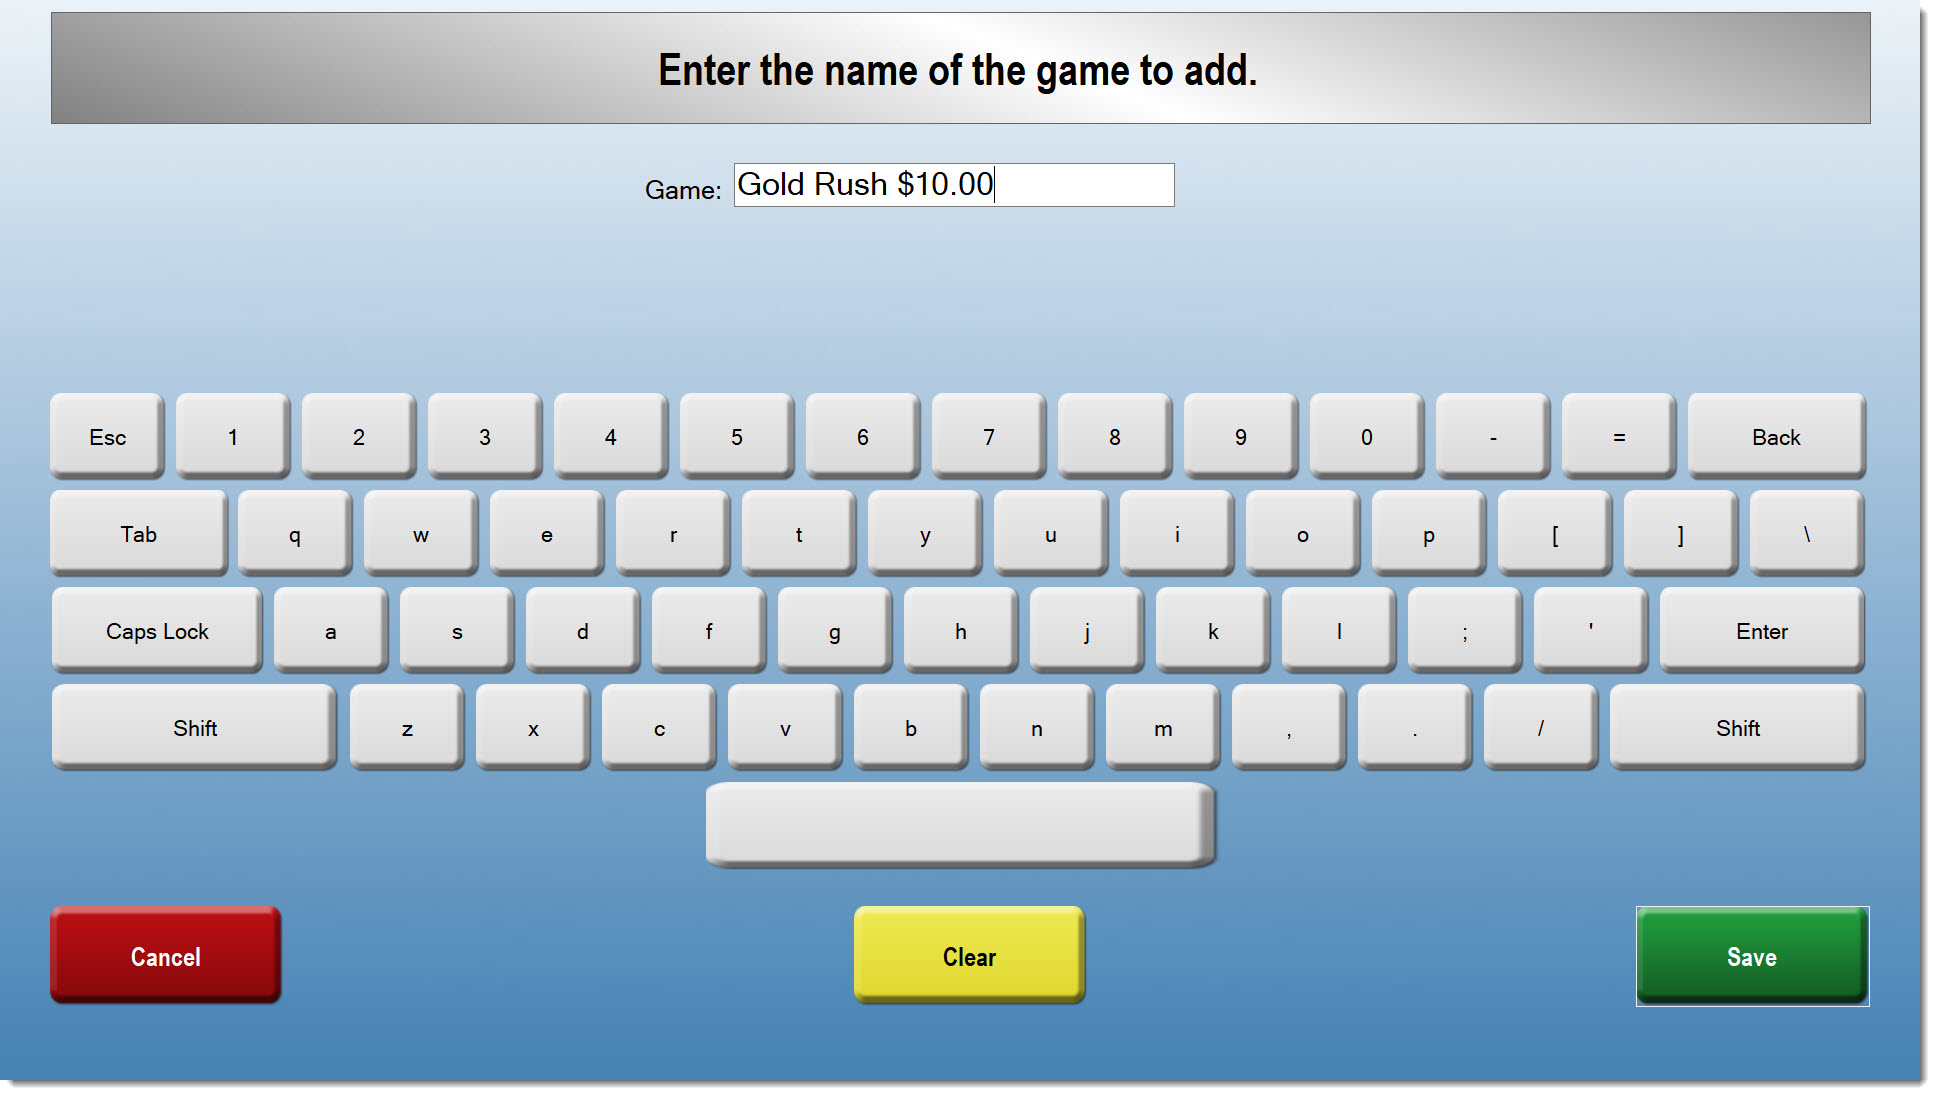
Next, you'll need to enter a name for the scratcher ticket game. Press Save to go to the last step.
Finally, scan the ending ticket serial number on the game pack.
Note: If your sealed ticket pack does not display an ending ticket serial number barcode, when prompted for that number press the ENTER button. You can then enter the number of tickets in the pack and your ending serial number will be calculated from the number of tickets you provide.
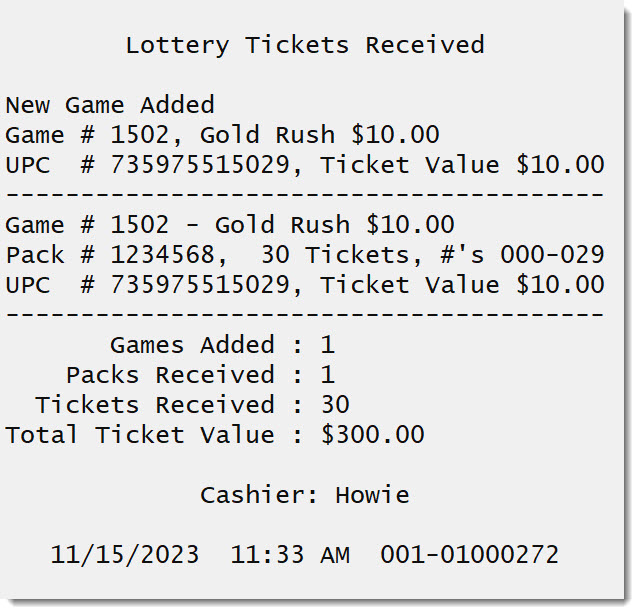
You have successfully received a new scratcher ticket game pack! You can continue receiving other new or existing games. When you've finished receiving, press "Save & Exit". A receipt will print out for your records, which is also saved to the Electronic Journal.
Step 4.2: Activate Tickets
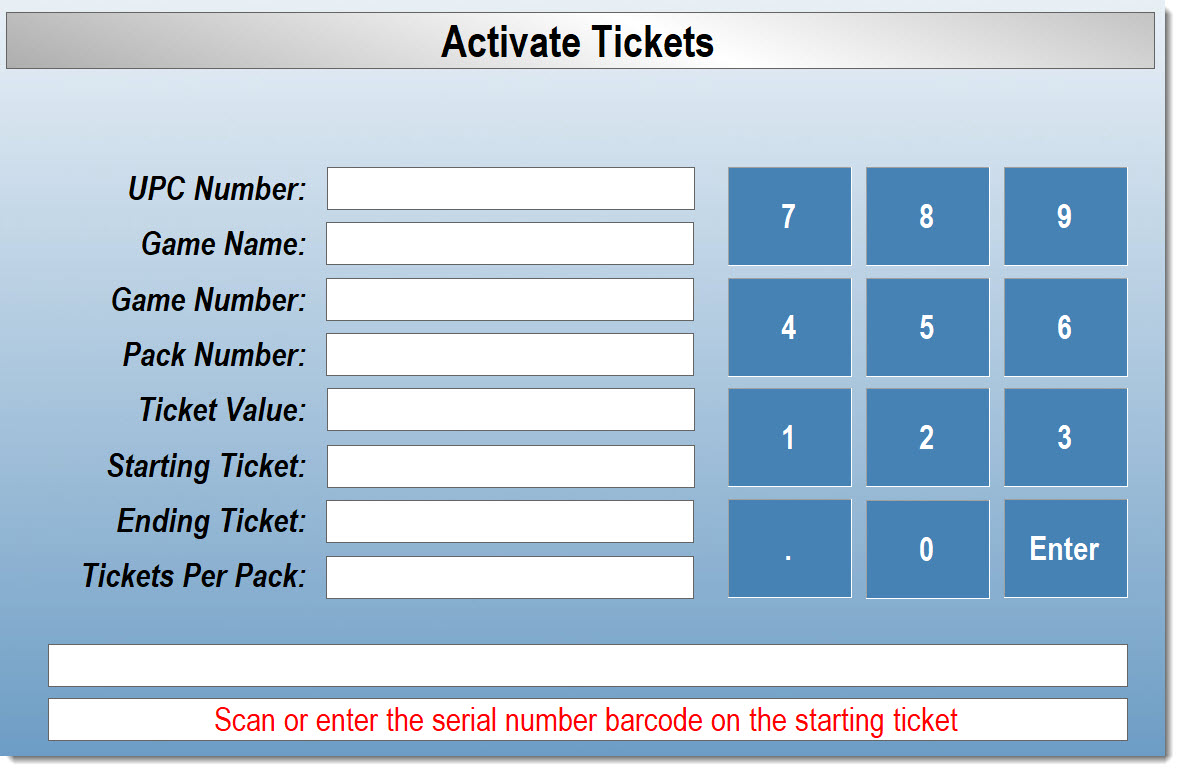
In the Scratcher Menu, press the "Activate Tickets" button. It is here that you will activate packs of games that you received into back-stock. You should only sell tickets you have activated.
Follow the instructions on the screen and scan the starting serial number barcode (not the UPC) on the new game pack you are activating. If you attempt to activate a game pack that has not been received, you will receive a message that the game number does not exist. In this case, go back to Receive Tickets.
Note: Because you are activating the tickets, if the sealed pack does not display an Ending Ticket serial barcode you will need to open the pack to scan the last ticket.
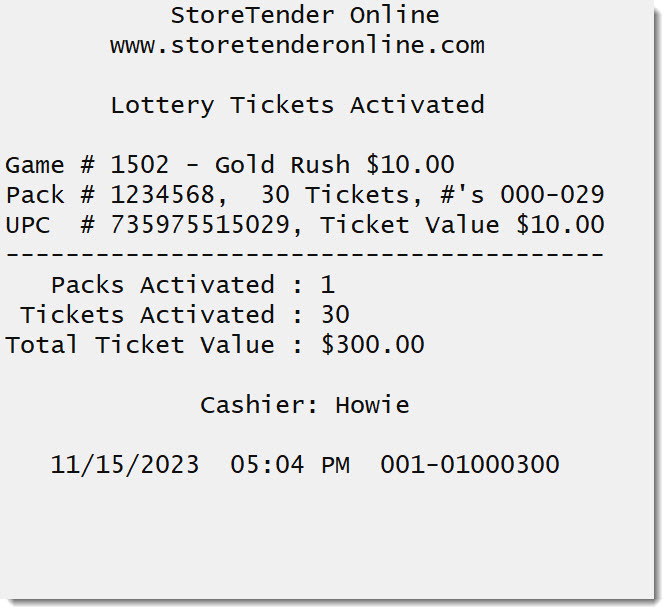
Follow the instructions and scan the starting and ending ticket serial number barcodes. You can repeat this process for multiple game packs. When completed, press "Save & Exit". A receipt will print showing your activity.
Step 4.3: Reconcile Tickets Start
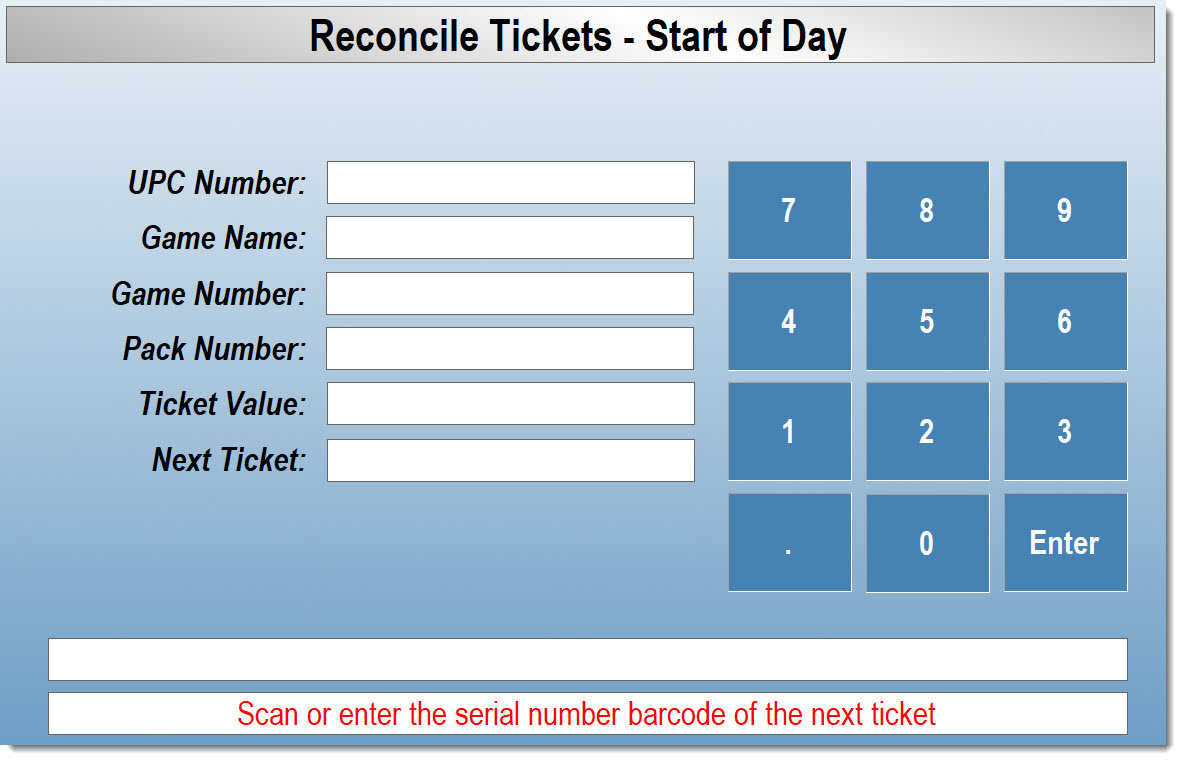
In the Scratcher Menu, press the "Reconcile Tickets Start" button. It is here that you will enter your starting serial numbers for your scratcher ticket games. We recommend doing this at the start of the day and/or the beginning of every shift. This is optional, because the next task "Reconcile Tickets End" will actually place the ending ticket serial number into the next reconciliation start. But, if you're concerned at all that tickets could be sold or become missing between the end and start of a shift, this tool will help you pinpoint where the loss occurred.
Follow the instructions on the screen and scan the top of the pack (next ticket for sale) serial number barcode (not the UPC) on each game you are counting. With a barcode scanner this daily or shift task will take little time, as you're only scanning the next available serial number for each game.
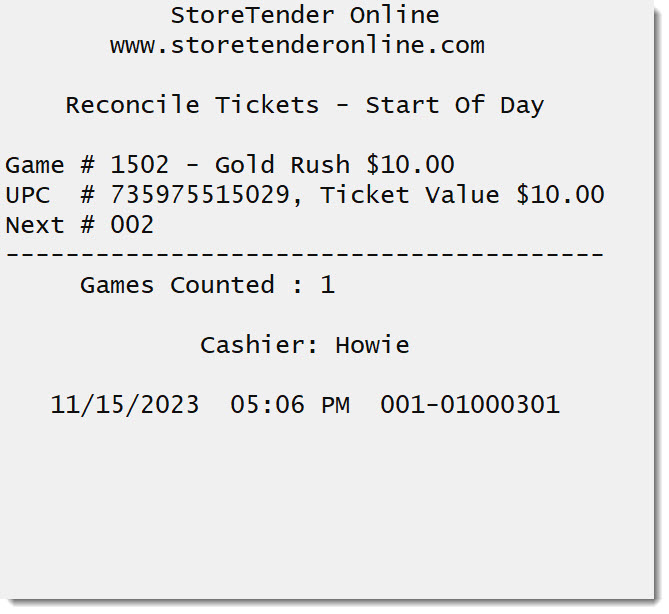
A receipt will print with a record of your starting reconciliation.
Step 4.4: Reconcile Tickets End
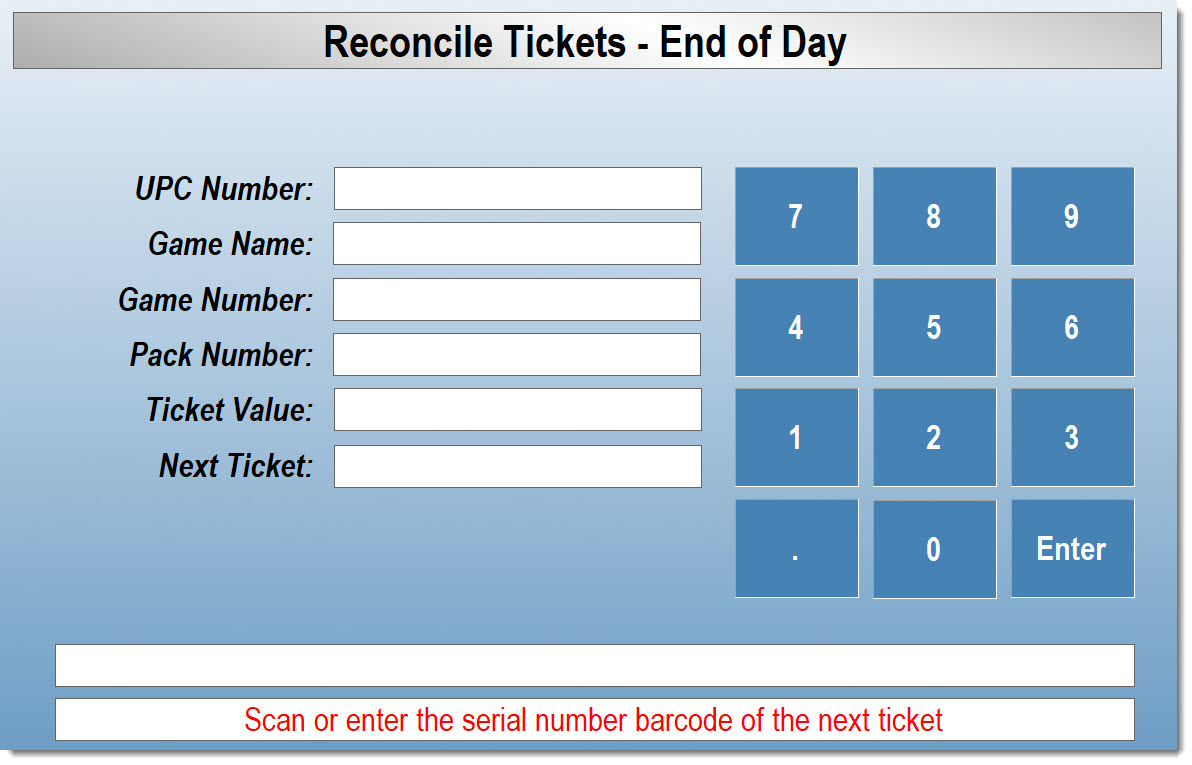
In the Scratcher Menu, press the "Reconcile Tickets End" button. It is here that you will enter your ending serial numbers for your scratcher ticket games. We recommend doing this at the end of the day and/or the end of every shift.
Follow the instructions on the screen and scan the top of the pack (next ticket for sale) serial number barcode (not the UPC) on each game you are counting. With a barcode scanner this daily or shift task will take little time, as you're only scanning the next available serial number for each game.
A receipt will print with a record of your ending reconciliation.
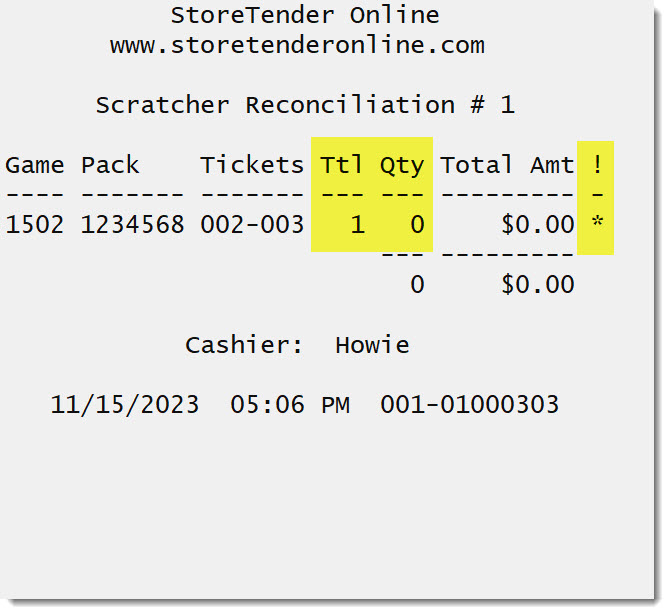
The ending reconciliation receipt will list the game, pack, starting and ending ticket numbers. Next, the total difference between starting and ending ticket numbers and the quantity sold during that time are listed.
As you can see from the above example, the reconciliation calculated that there was 1 ticket number difference between the starting and ending reconciliations. The "Qty" column shows that 0 tickets were sold for a total of $0.00. Because there is a discrepance between the count and sales, there is an asterisk (*) under the "!" column at the end. This will help you quickly spot discrepancies.
Every receipt that is printed should be turned in with the daily or shift sales for management review. Receipts not printed are saved in the Electronic Journal (Data > Journals) and is available for review there. You can quickly find these electronic copies by searching for the following terms:
- Lottery Tickets Activated
- Lottery Tickets Received
- Reconcile Tickets - Start Of Day
- Reconcile Tickets - End Of Day


